• Blog
  • Artwork
  • Film
  • About
  • Art for Sale
  • Hand Cast Sculptures
  • Apparel
Menu

Hite Studios

Street Address
Lakewood, Ohio
Phone Number

Your Custom Text Here

Hite Studios

  • Blog
  • Artwork
  • Film
  • About
  • Art for Sale
  • Hand Cast Sculptures
  • Apparel

Making The Cacolantern

January 31, 2016 Jason Hite
Jason Hite next to his new nightlight.

Jason Hite next to his new nightlight.

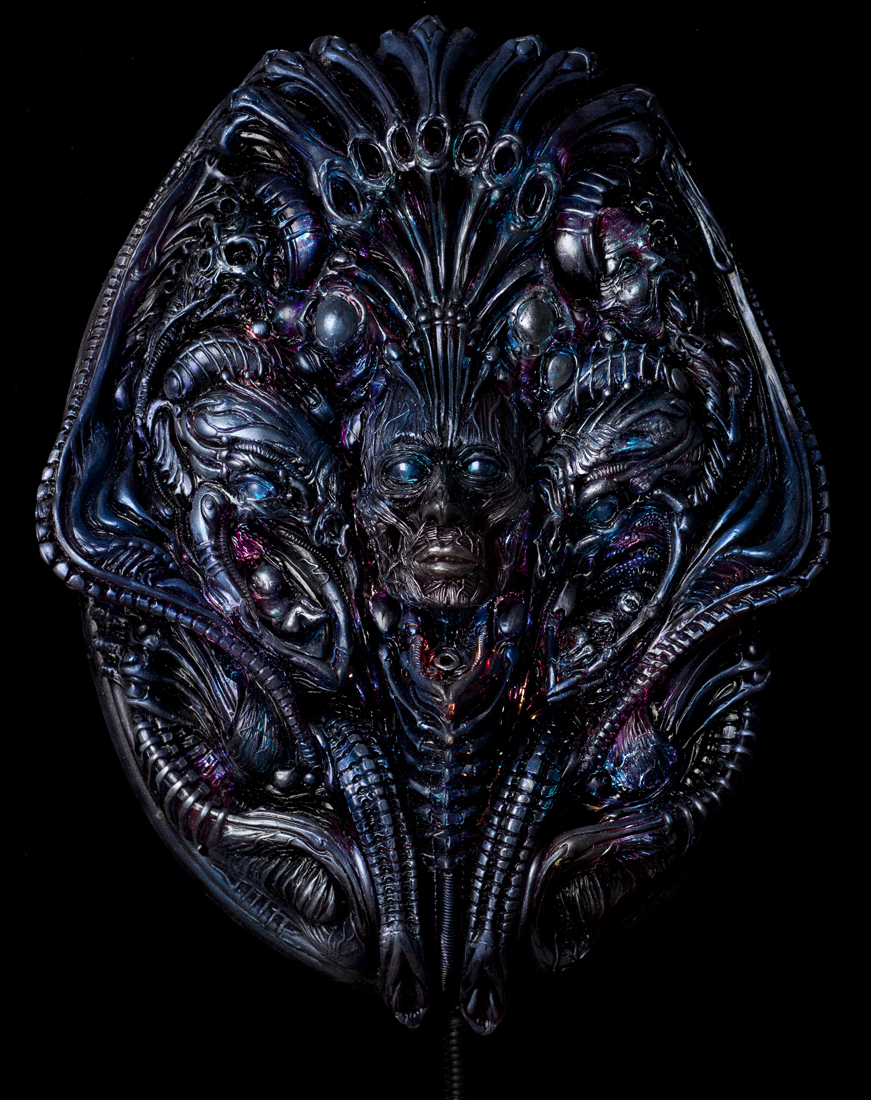
My obsession with the 1993 video game DOOM continues. Back in November of 2014, I had this grip of inspiration to make 1 of the classic DOOM monsters at a large enough scale to look somewhat realistic. I had so much fun sculpting a small 2" version for "Icons of DOOM" in 2 hours, I thought it would be crazy fun to make a 12" version. It was fun but I severely underestimated just how long and how much work it was to make her. People sometimes get upset when I charge $3500 for a sculpture and don't understand all the time and materials that go into making something like this. Oh, and yes, I said her. I believe that these creatures are female, based on the DOOM sprites I referenced.

Humble beginings of the Styrophone-Ball

Humble beginings of the Styrophone-Ball

I started with a simple 10" styrofoam ball. After carving the mouth and eye socket, I mounted it to a base and coated the ball with a 2-part urethane resin to help seal the styrofoam. I jammed on the clay using Monsterclay, which is an oil-based clay. Little by little, I picked away at the details and shapes and slowly found my version of this sinister beast. 

Here is a quick 17 second turnaround after my first 2 hours or so on starting the detail. 

Say AHHHHHH!

 I started with the inside cavity of the mouth and slowly worked my way out. It was tricky as hell to do this and I wish I had made the lower jaw removable. Good thing I have skinny fingers!

First person sculpting

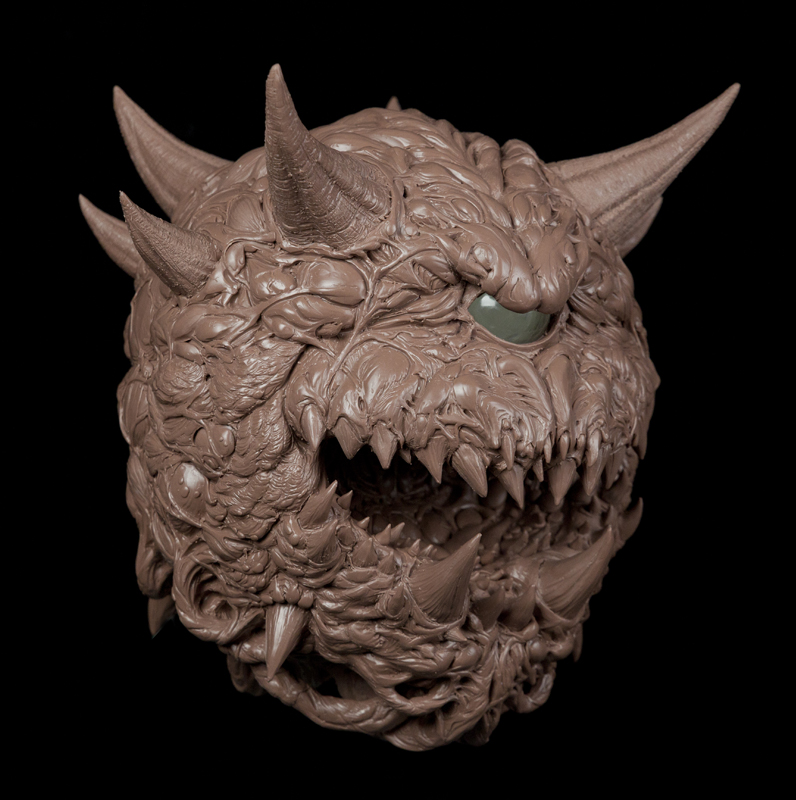
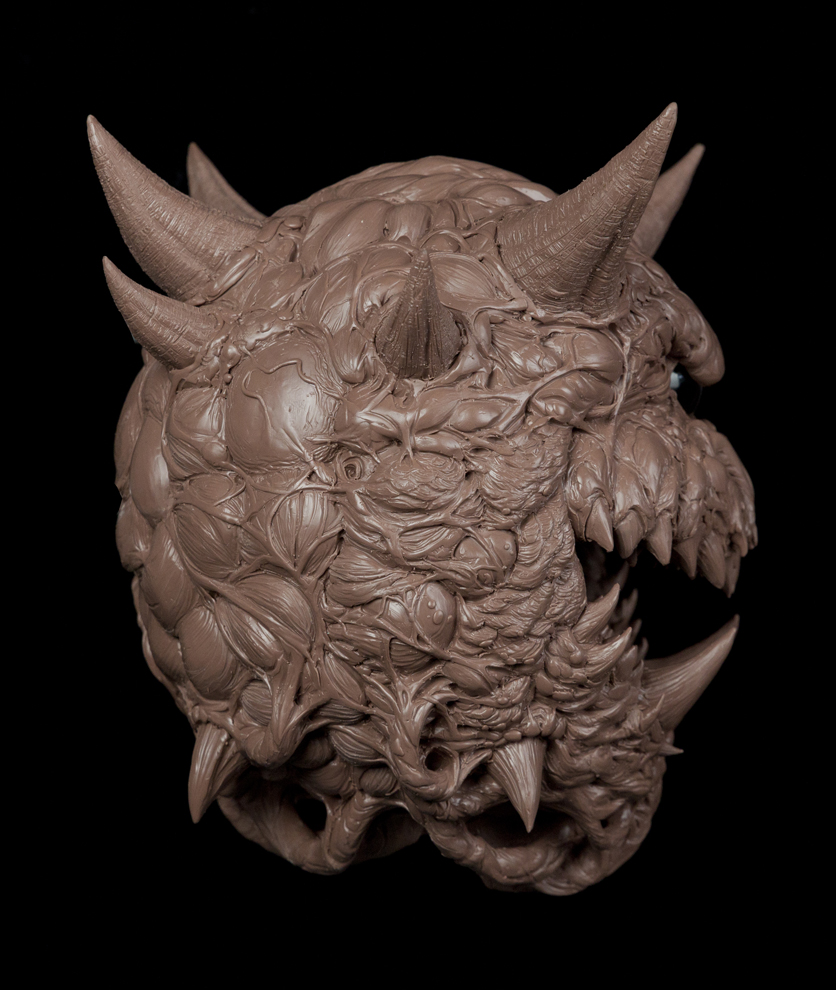
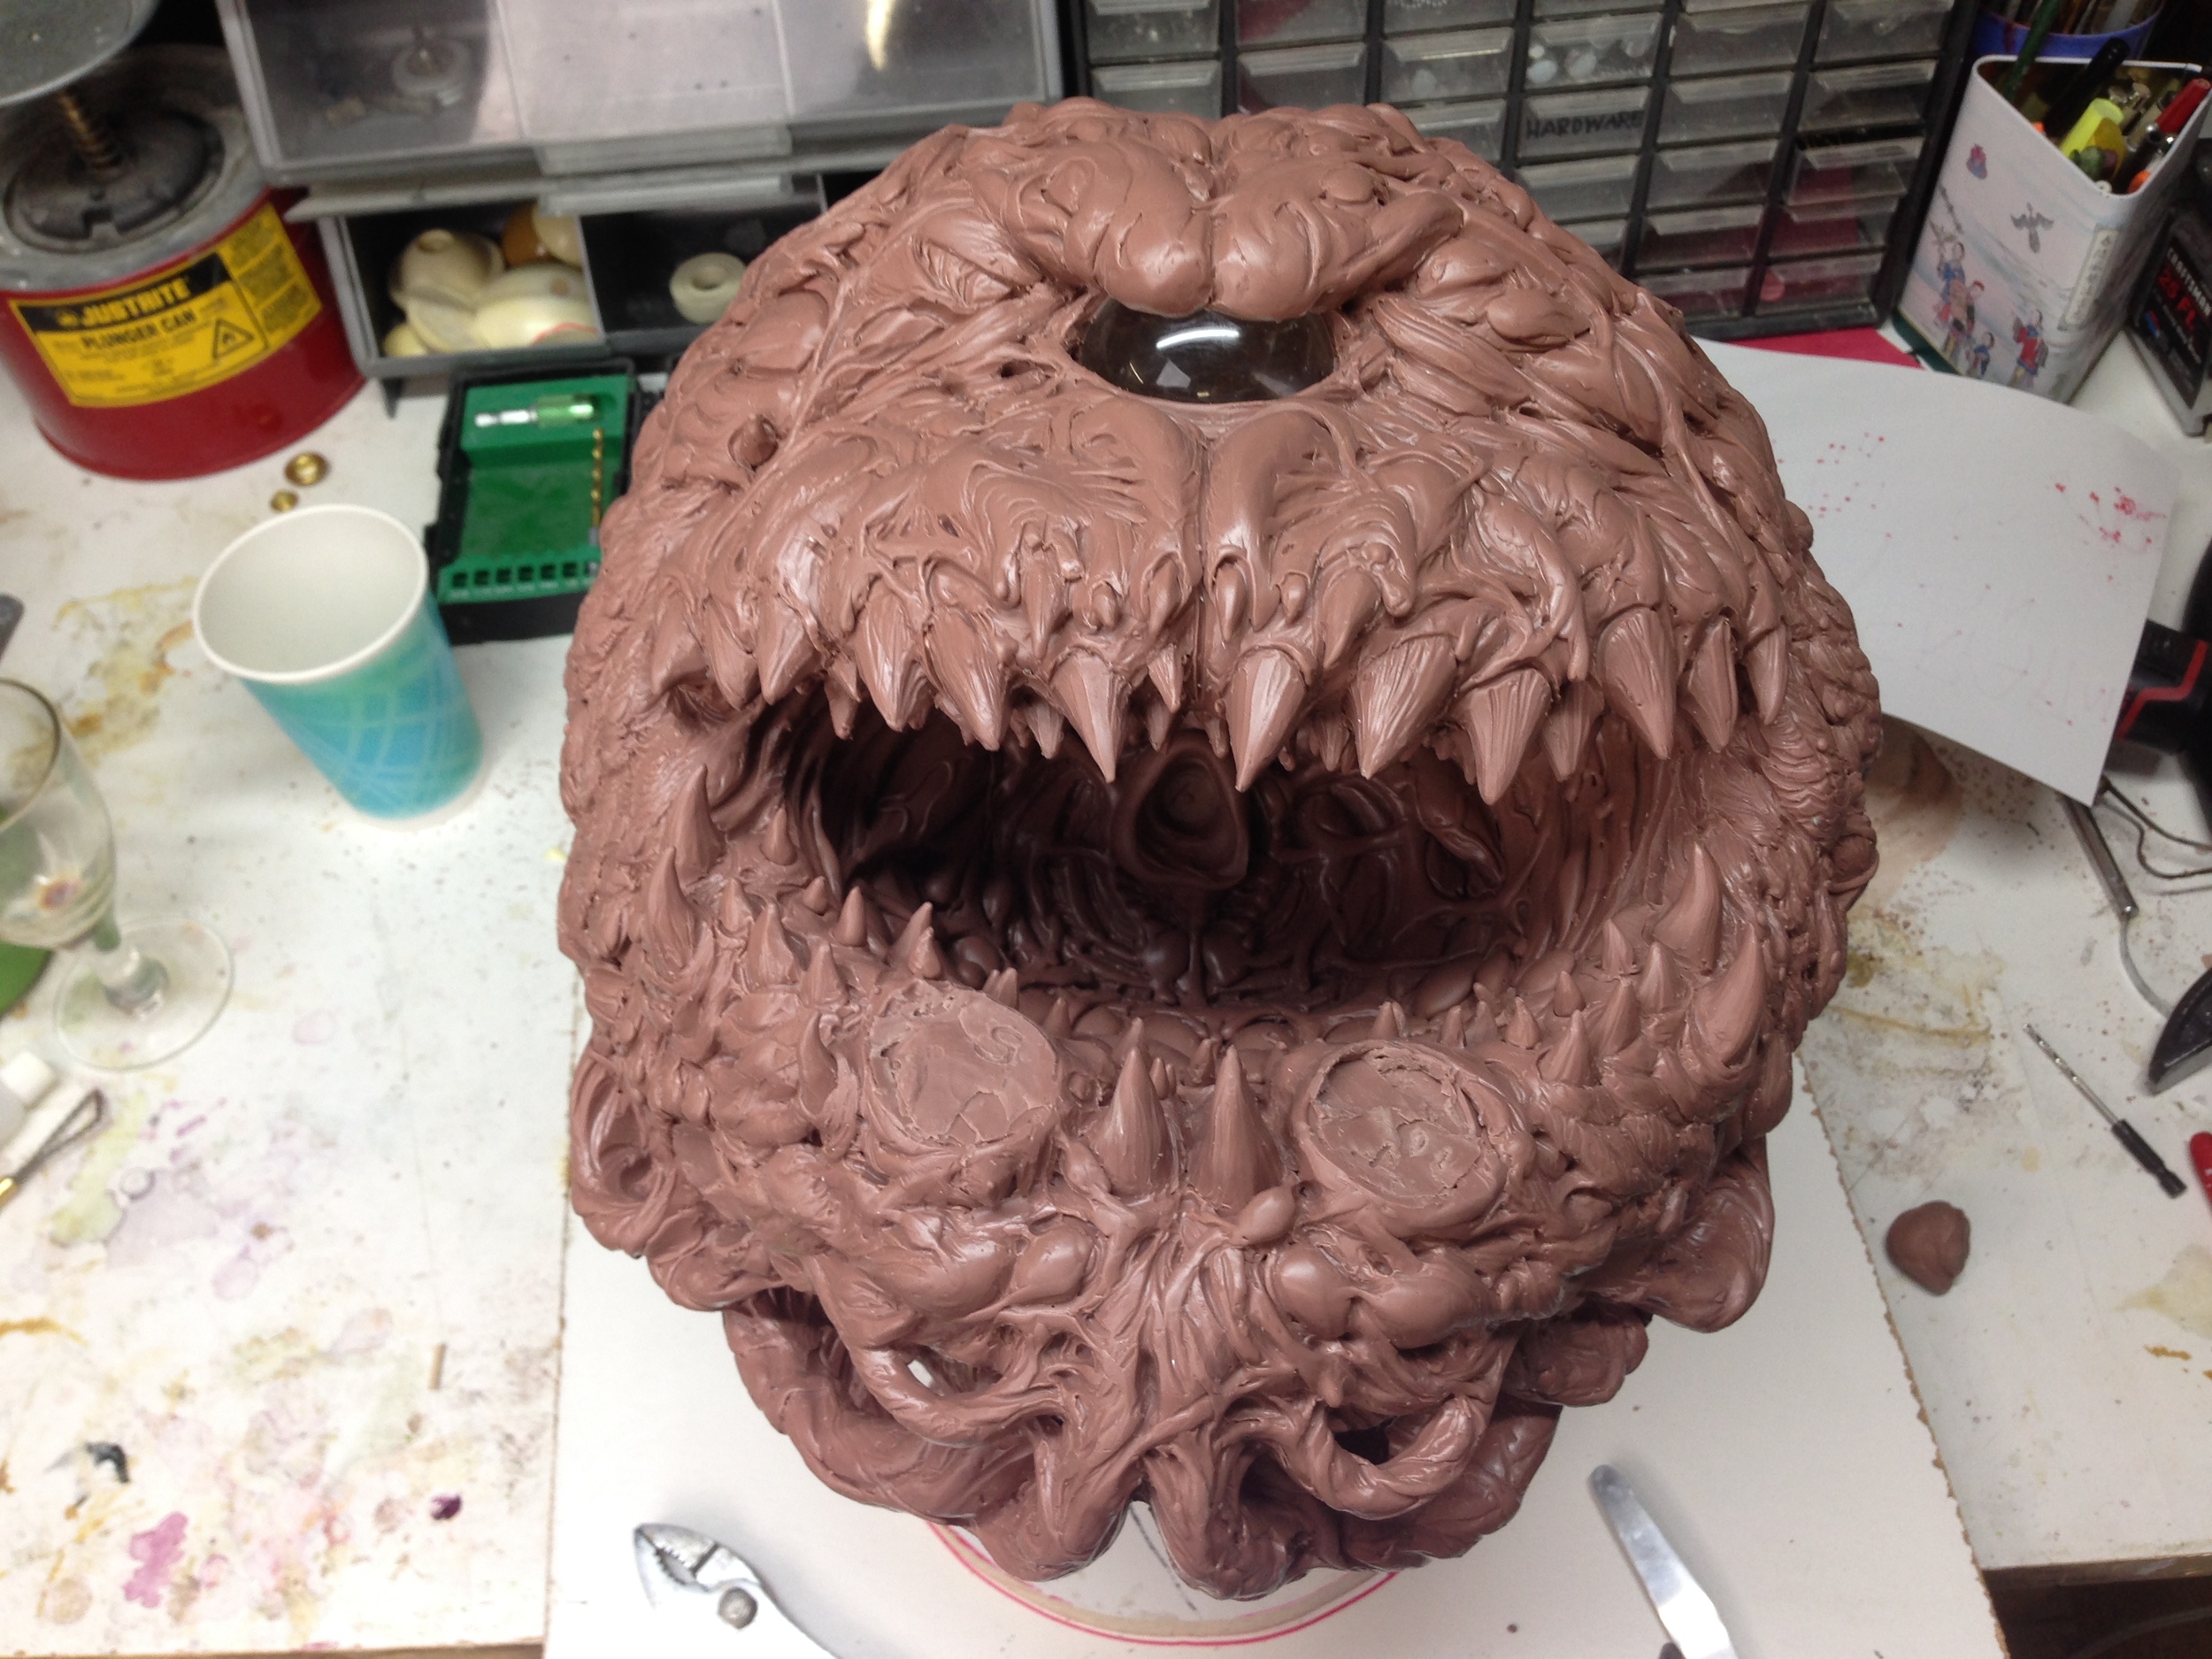
Above is an image of first-person sculpting! After what seemed to be months and months of a little sculpting here and a little sculpting there, I managed to make my way through this strange 360 ball of pure, intense detail. The horn textures were inspired by a bitchin' horn I acquired at Disguise, my old job, sculpted by Miles Teves for a film that never saw the light of day called "This Present Darkness".  Years ago, my old boss Paul Palmeiri brought this horn into work and told me about some of the monsters and designs he had a hand in. If I recall correctly, it was being done at Cannom Creations Inc? The film was based on the book by Frank Peretti and supposedly had loads of demons in it. One day Paul managed to throw some resin into a horn mold from one of the suits they made and now I've been holding onto that freaking horn for years! The subtlety of details and dynamic form always amazes me. Miles is such an amazing artist it boggles my mind. Have a look below, I can only imaging what the rest of this monster's body looked like. I owe a lot of my success in sculpture to Paul Palmeiri. He taught me a lot about sculpture and was always pushing me to the next level when he was my boss. 

Teves horn

So this little demon ended up with 12 horns and a shit-ton of teeth. I really wanted to make this Cacodemon my own and bring as many details out as I could.  The original inspiration for id when developing this creature for DOOM was a painting by Jeff Easley. I believe Kevin Cloud or Adrian Carmack partially pixelated the image from Advanced Dungeons and Dragon's 2nd edition Planescape manual. The creature in the image is called an Astral Dreadnaught. Check it out at the link here.  I wanted to pay homage to that original Jeff Easly painting as well and was at the forefront of my mind when coming up with the textures on my Cacodemon.

Final Clay sculpture
Cacodemon Side
Cacodemon Side 2
Cacodemon Clay back

The most difficult part of this project was trying to figure out how the hell to mold it! I started by cutting off the horns and larger teeth. Doing this simplifies the basic shape. Horns and pointy objects are tricky  to cast out of a mold successfully without any air bubbles in the tips.  I'll talk more on that later. 

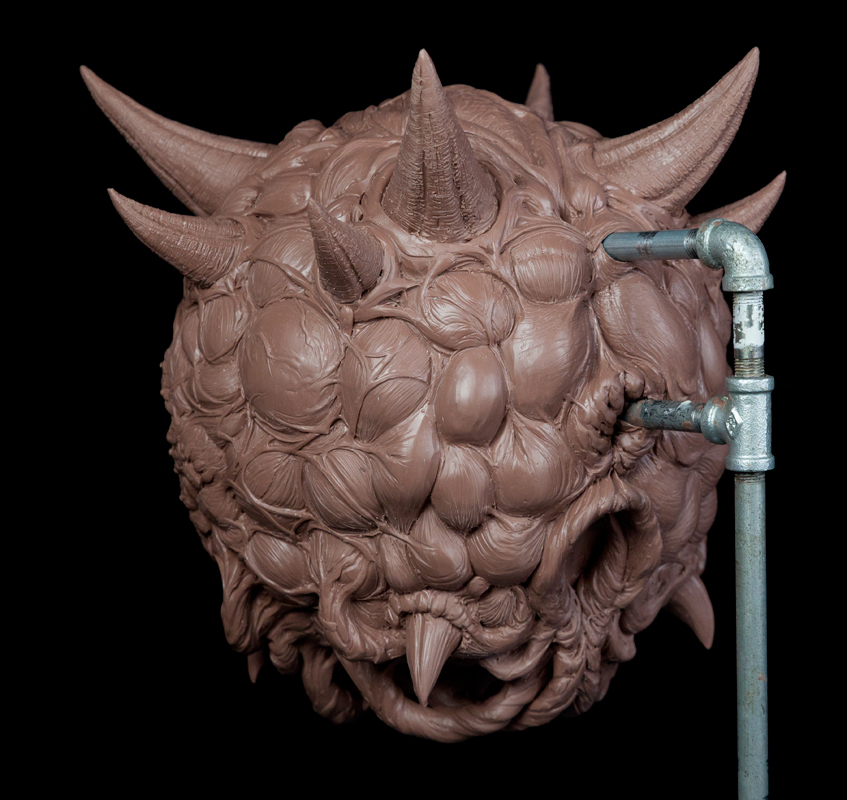
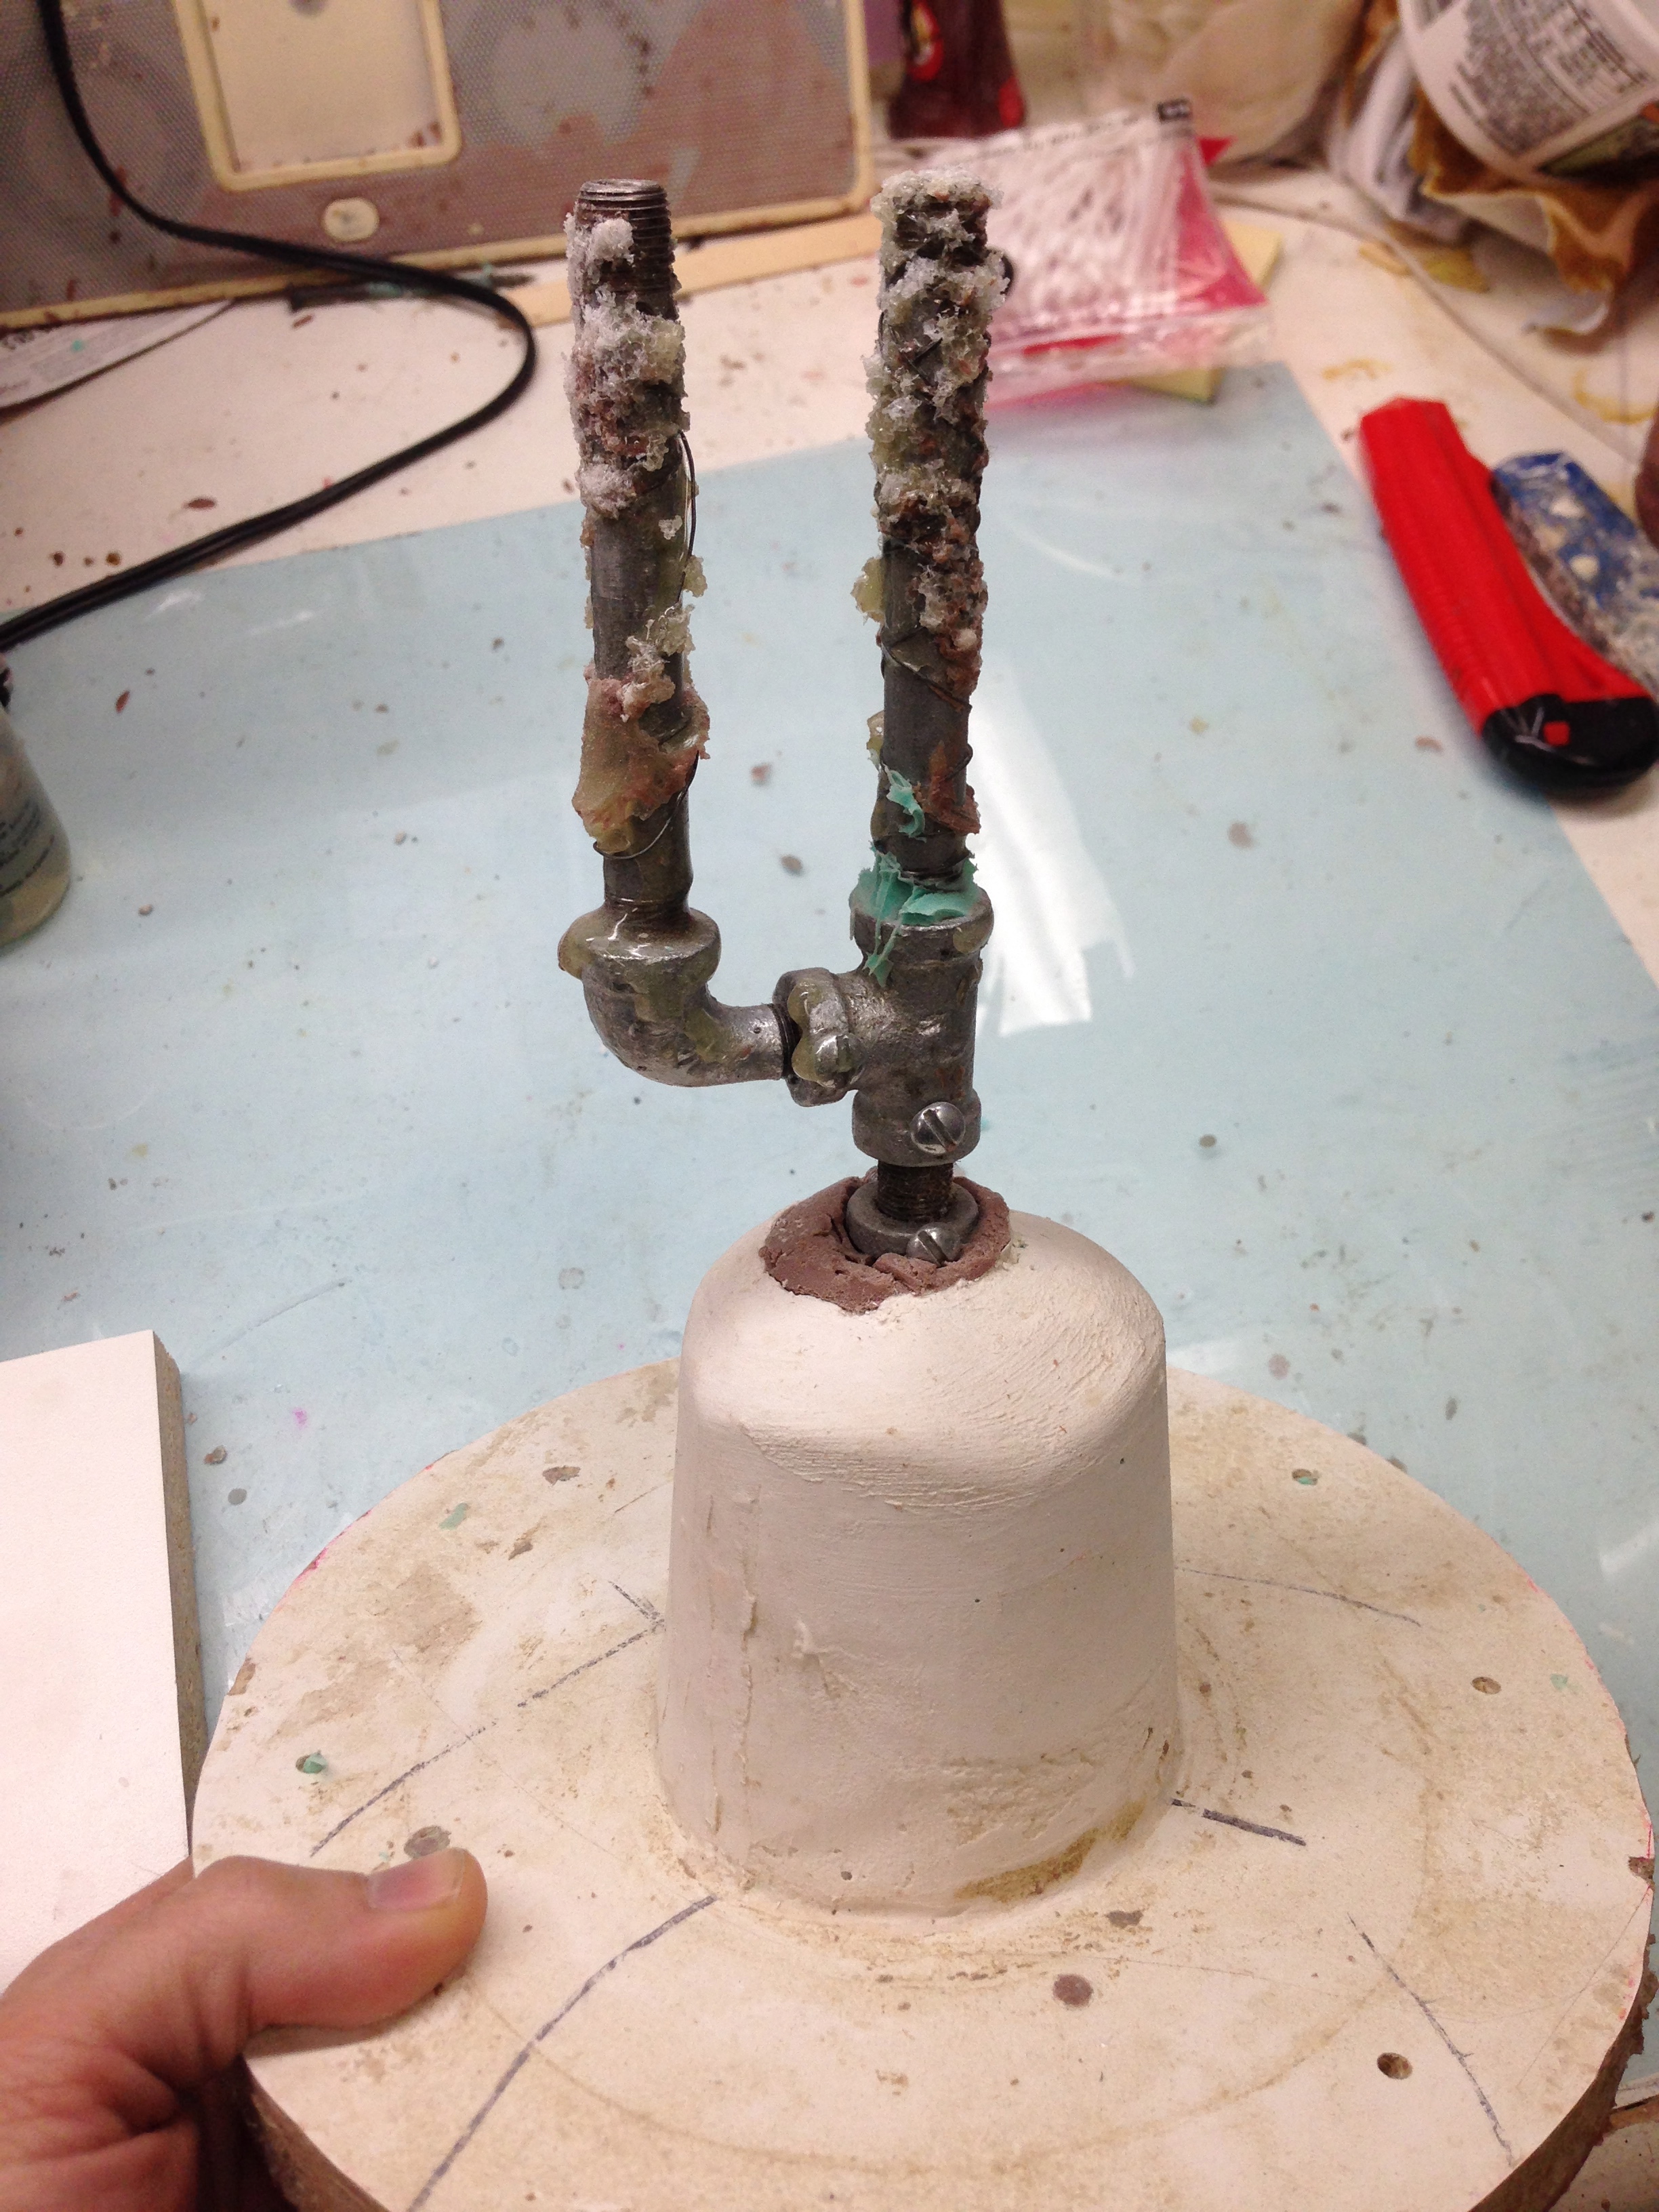
The trick was firmly attaching the sculpture to the board so it wouldn't move at all while in the molding process. If the sculpture moves, even a little out of place once I start the process, it can ruin the mold and possibly the entire sculpture.  To firmly secure her, I devised a simple 2-pronged pipe which I inserted into her rear orifice. Having just 1 prong or pipe could allow the sculpture to spin. Two posts  gives a mechanical hold preventing any spin. The image below is the simple 2-pipe-prong I built. I remember walking around the hardware store fitting pieces together praying it wasn't too big. Before I epoxied this into the sculpture I wrapped the pipes with floral wire to give them more teeth. The image below was taken post-molding and you can see that it took some of the styrofoam with it when I removed it from the sculpture. 

Prong pipes!

Once the sculpture was completely secure on the pipes, they were incased in clay and would eventually serve as the pour spout in the silicone mold. Now it was time to start laying up the clay. This thin 3/8" of water-based clay, called bubblegum,  is carefully placed over the sculpture. It's strange to see this but I have wrapped a plastic bag around the sculpture to keep the bubble gum clay from sticking to it. The equator-like ridge in the clay layup serves as the division point where I cut the mold apart.

Now the part I most dread...the fiberglass jackets! Fiberglass makes amazing molds and mold jackets but, they smell and are very toxic to work with. I think I spent four solid days wearing a respirator when making these molds. Below is a shot just before I was ready to pour the green rubber silicone into the mold jackets. The original 3/8' of clay was removed to provide the cavity to make the rubber mold.

Fiberglass jackets

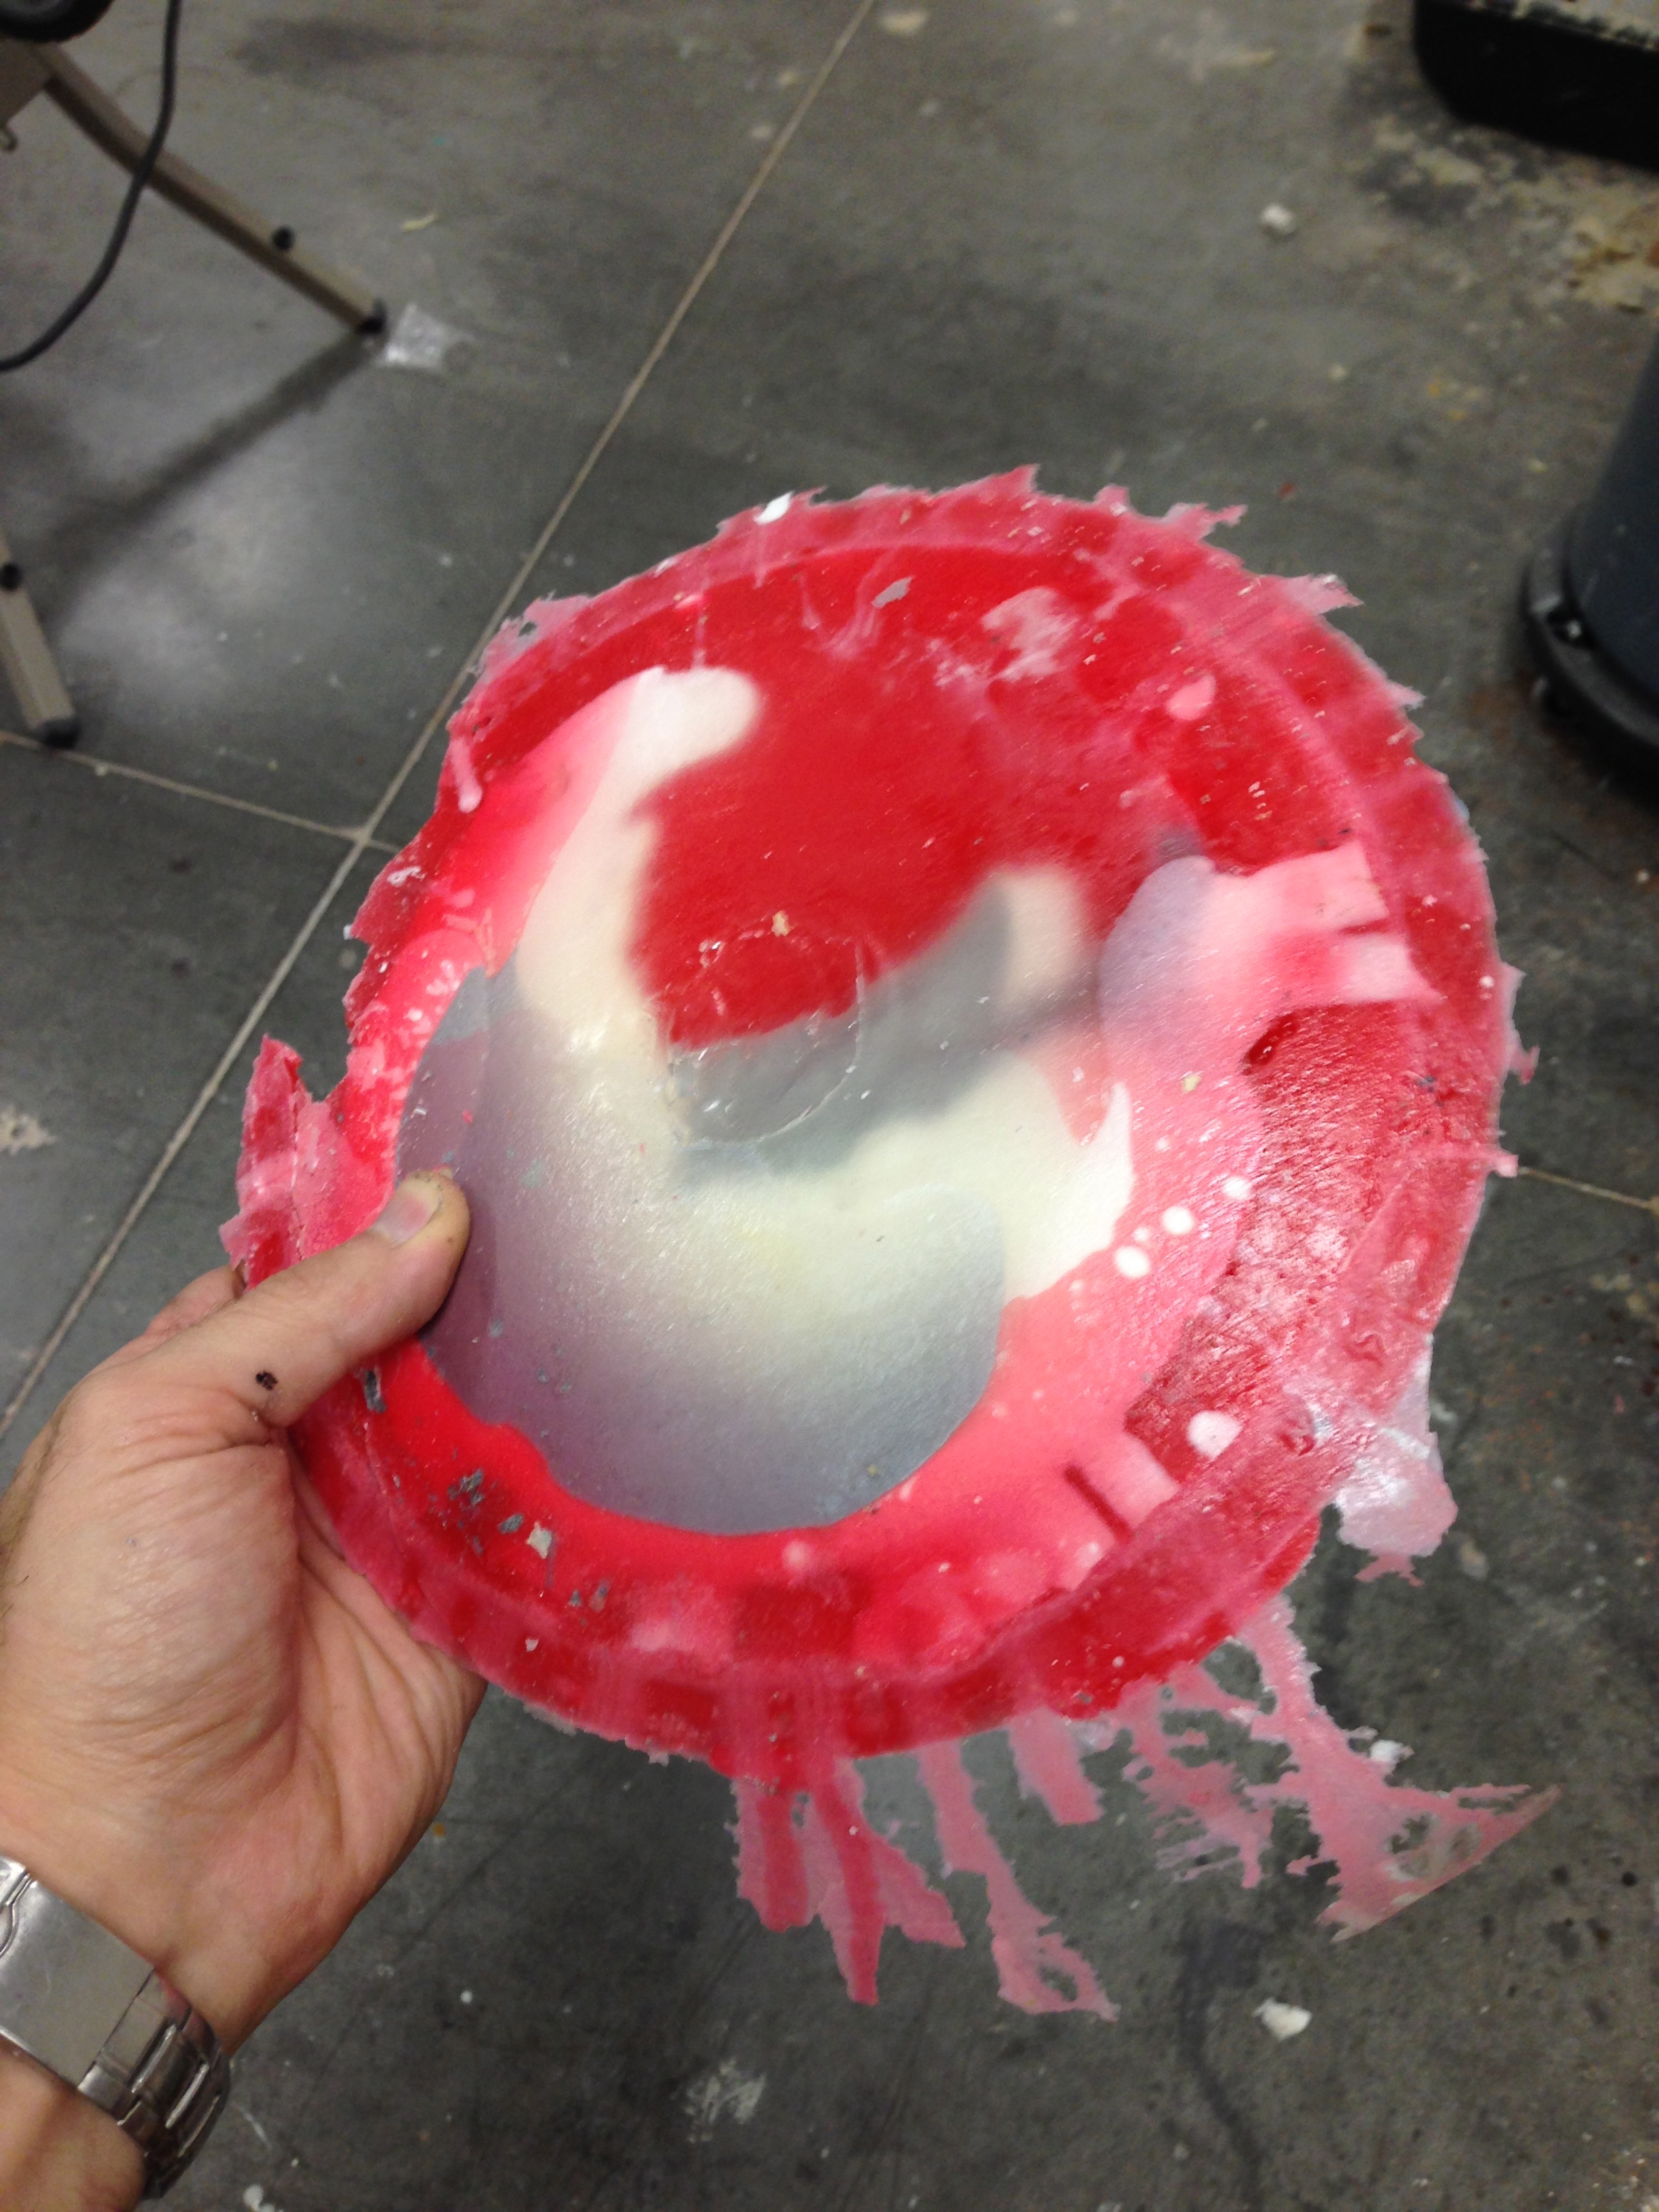
Once the liquid silicone rubber is catalyzed, it firms up in about 8-16 hours. I use a 25 durometer silicone which basically means the hardness of the material. The higher the durometer the harder the material. 25 is pretty soft. Below is the front half of the mold after it was painstakingly cut with a special gutter key blade I make out of standard X-acto blades to create a uniform groove in the silicone to help the two halves key back up and fit together perfectly when casting parts out of the mold. 

Silicone Front half

At this point I could have just started casting pieces, but I decided to make things a bit more complicated. I wanted a smooth interior surface that would accept a custom eyeball and registration points for all my internal LED light fixtures. Because the mouth cavity is so cavernous and essentially, anything ridged would lock into the mold, it had to be cut out of the mold and dealt with separately. The image below is the clay-filled front half with the acrylic eyeball. To do this, I melted Monstermakers clay to paint in layers until I built a sufficient 1/8" to 1/14" thickness. Once this was done I carefully cut the mouth cavity out. with the layered clay on top so the pieces would register when this was eventually cast. 

Front half interior

Next was the interior mold over this clay skin, done again with 3/8" bubble gum clay, as seen in the photo below. The large tube in the bubblegum clay serves as the pour spout for the silicone once it has a fiberglass jacket. The smaller white PVC tube serves as the pour spout when actually casting the front half. 

Gasket back for front half

The same treatment was done to the back half of the original case mold with some modifications. The three black PVC rings in the image below are the brackets to hold the LED lights along with the strange clay posts that will hold the electronics. The white PVC tube again will serve as the pour spout. The little white circular ports labeled A and B, are spacers that will allow me to insert the translucent blue nodes seen in the back of the Cacodemon that turn from brown to blue when it is about to fire a plasma ball. To make these simple spacers I cast the nodes in the original mold first and remolded them separately then put them back into the mold before I painted in the clay. All of this was a lot of problem solving and trying to figure out how things would fit back together once made into separate pieces with each part cast in different colors. The clay ridge was created by casting just the ring of the front half and fitting it on to help key up the two halves. I have to thank my good friend Mike Biasi for helping me figure that out. This clay ridge was curtail in fitting everything back together.

Back half of mold with clay skin

Once I figured out that bit, it was time to finish molding the back half. I also forgot to mention that I was designing these molds to fit very snugly into my pressure chamber with an interior diameter of  only 14 inches! This meant that my fiberglass mold jackets would be trimmed to the bare minimum.

Back half gasket mold

Meanwhile, I was also making cup molds for each of the 12 horns and 2 large teeth. Below, my son Lucian helped me de-mold the horns. 

The Cacodemon eyeball was very fun and challenging  to make. First, I made a simple silicone cup mold of the acrylic sphere I used for the eye. Then I cast a resin copy and ground a flat area for the pupil  (see pic 1 below). Next, I took some Monster clay and carefully sculpted a gross pupil, referencing cat eyes. These pupils essentially work like sphincter muscles (see pic 2). Once the sculpt was complete, I molded it in a silicone cup mold, then cast an eye using a phosphorescent yellow pigment. Carefully, I painted it green but made sure that the yellow would still shown through. In the fourth image below, check out the painted eye beneath an LED light pad. Finally, I put that painted eye into the first mold of the acrylic sphere and filled it with water clear translucent resin to create the cornea over the pupil (see pic 3). My first attempt at this failed. The water clear resin I used proved to be unstable with the thin layer I was making over the pupil. All the eye parts were cast in my pressure pot to reduce air bubbles. This pressure pot with 60 lbs of air pressure in it, shrinks the bubbles making them invisible to the naked eye until the resin sets up which is usually in about 2-4 hours. This worked fantastically at first, but about a day after the eye was finished, the water-clear resin started to bubble and delaminate from the pupil. The resin was not completely set up. To resolve this I kept the mold in the pressure pot for 2 days to make sure the resin set up properly. In retrospect, I should have purchased newer clear resin. 

The Eyes have it

With almost all the molds being complete, it was time to start casting parts! Below is the front half mold fit very snugly into my pressure pot. The PVC tube sticking out with the orange funnel is the extended pour spout. The orientation of the mold is such that when the resin is poured it fills from the bottom up. This prevents air from being trapped in the mold during the pour. I have three tiny vents at the top of the mold that bleed resin indicating the mold is filled. 

Pressure pot casting fromt half

The front half came out beautifully! I should note that before I put the mold in the pressure pot I carefully cast only the teeth in the mold in plain white resin. Then I closed the mold and put it in the pressure pot to cast the remaining in a bright red color. This basic color differentiation helps immensely when painting later. I think it also looks like the Cacodemon has rabies! 

Front half casting

The second half proved to be a bit more challenging. Essentially, I had to make a butt-plug to negate the original pour spout in favor of the PVC spout on the inside of the mold. This and other factors lead to a massive leak in the mold. A large portion of 1800 grams of red tinted resin ended up at the bottom of my pressure pot. I had to use a 4 foot crowbar to get it out :( 

Resin Mess

With a little more trail and error I finally got the back half mold to seal properly. Before long, I had 2 halves to reassemble. I started by first painting the inside with black primer to obscure any unwanted light getting though, then silver over that. The silver helps to reflect the light. Next was anchoring the light pads and electronics. In the below image you can see the blue nodes encased in the back half now along with all the light pads. I should also note that all the horns were glued then screwed into place.

Finished halves

The final step was mounting it to a base then attaching the halves together. Even though the halves fit well together there was a 1/16"-1/4" gap in some places making the seam very noticeable. To fix this, Ifound places to screw them together, then I thickened some red pigmented resin with Cabosil which is very toxic for our lungs, put it in large syringes and filled the gaps. This worked beautifully as a seaming agent. The only downside is that if I ever need to get back into the inside of the Cacodemon, I'd have to break it apart. Below is a video I made after it was completed to show it off a bit. I especially had fun making a latex version of the Cacodemon to make the death scene. 

Caco Dead

Someday, I need to make a Cacodemon that can fly and shoot, but that is for another time. If you hung on and read the entire post I have a treat for you!  Leave a comment and I will send you my high resolution HD sprites for this Cacodemon, as seen below! If you are interested in purchasing a Cacolantern you can find different offerings in my Etsy store here.

Enjoy- Jason A. Hite

Cacodemon HD sprite
In Uncategorized
9 Comments

Childhood Religion

January 21, 2015 Jason Hite
STAR-WARS-detail-Hanger1.jpg
STAR-WARS-detail-3Q_sm.jpg

A long time ago in a land far, far away...I got an AT-AT for Christmas. It was 1981 on Christmas Eve, and I was 5 years old when my world changed with that gift. The thing was like a robot dog almost as big as me! My aunts and uncles put their money together to get it for me. I don't think it was something I asked for and my parents couldn't afford it, but I am so grateful for that toy. A year before that Christmas, when Empire Strikes back came out in theaters, I distinctly recall my uncle Peter telling me that I was not old enough to see it. I was heart broken and I didn't even know exactly what Star Wars was yet! I just knew that the toys were amazing and other kids on the playgrounds had them and coveted mine. I remember the day I lost my C3-Po to the sandy bottom of the playground in our apartment complex. I searched for hours and every time I went back there, I searched. Star Wars was the introduction of the wonderful world of toys for me and I never really got over it. Even after I got out of my Star Wars phase, another property or "license" replaced it.  Transformers was a big one for me, too. My best friend Mike Kondis and I would put our figures together, build forts out of the packaging and create our own scenarios. The forts started to get so complex that we would tape them together with whatever we could find. I hated dismantling them so I began to build them in my very small bedroom closet. When I think back to those action figure forts I made and look at what I make now, I guess you could say, I'm out of the closet!

Have a look at the little intro video I made of the piece. The sculpture will be in the Copro Gallery's Conjoined V show, which runs January 24th - February 14, 2015. The size is approximately 59" tall x 41" wide x 10.5" deep. Come check it out in Santa Monica if you have the chance; I'd love to meet and talk about it at the opening show.

AT_AT-e1421819777426.jpg

This assemblage sculpture represents that part of my childhood along with the millions of other kids who played with and collected Star Wars toys. There are seven different room or scenes within the "cross-destroyer" I created. It started with the discovery of some vintage 80's Star Wars play sets I never saw growing up and highly detailed game pieces of every fucking character from the movies and then some. I got obsessed with getting certain figures and I didn't even have a plan at that time. I just wanted the ones I always wanted as a kid!

STAR WARS Childhood Religion
The Beginning
The Beginning

Not having a good plan to start is a bad idea. Here is why. In January of 2014, I thought I had it. I thought I knew what I was going to do. I used an old star I made back in 2012  to make a "Death Star" using figures and sets. It was going to be awesome, right? WRONG! It looked terrible no matter what I did with it. It was an overcomplicated shape and anything I wanted to add around it looked bad. Frustrated the hell out of me. So I tore it apart, but my kids, 6 and 3, both loved all the Star Wars stuff I was collecting. They constantly wanted to play with it. Go figure. Then one day, my son Lucian, the 6 year old, and I took just the round wood base without the star, and cobbled together the sets into a little scene. We built it at his height about 3.5 feet off the ground. It was great! The kids played with it, set up their own forts with the bits I have around my studio and played with the figures. It was so cool to watch them play with it while I worked on other projects in my little sculpture room. I didn't realize this until now, but it was like a full circle from my childhood to theirs. I'm kicking myself for not taking a picture of it!

Bits
Bits

In November of  2014, I woke up one morning, sat down in my studio and looked at something my son arranged with the figures on the set we built. A battle scene that always changed whenever he came in to play. It was then I decided to take another stab at making something with the small fortune I spent on Ebay Star Wars toys. The moment I abandoned the circular base, I finally got my head around making something that looked right. Eventually, I landed on the cross shape. The hard angles are easier to make into rooms and I have an affinity for crosses. As kids, we are told to do things and made to go to school, go to church, obey your parents, teachers and so on. Things we don't really care about are jammed down our throats in those places by adults. Star Wars was something I wanted to know all about as a kid and it never insisted on itself. It was my religion, or faith, at the time, and all of the other kids I played with felt the same. Ironically, later in life when I was in college, two classmates in some of my classes would constantly debate Star Wars, every day for months. I got so sick of hearing about it I started to hate Star Wars. That hate got me thinking deeper about the dark side of it. The Star Wars license is what really started the entertainment-based action figure business that I love. How may tons of plastic toys, derived from petroleum, are made in a foreign country like China? How are the working conditions in those factories? How many of those workers making the toys out of hazardous materials are children themselves? We Americans tend to forget where our products come from and what goes into making them, and I'm not just talking about toys. Not to mention the economic problems outsourcing our factory work and labor to foreign countries causes. I've visited factories in China. Some of them were the worst places I have ever been. The smell of chemicals gave me a serious headache after 5 min. Below is a picture I took in a factory pouring hot vinyl. It was summer, sweltering hot, and that vinyl is heated to over 200 degrees to cast. The fumes alone are toxic to inhale. How many burns did this poor man and the others around him endure in just one week and for what? So that we can buy it in a store and discard it after a year? Millions of toys are made out of vinyl. They are not all done in this method, but I ask myself these questions when I look at a piece of plastic in the stores. I don't have all the answers, but I try repurpose as many things as I can. Never buy anything new if I can help it.

OLYMPUS DIGITAL CAMERA
starwars Sketch
starwars Sketch

OK, I digressed a little. Sorry, back to how I made the piece. Just to get my bearings, I did a quick sketch of the general shape and details. In the end, I simplified the shapes a bit to make it read better as a cross. My main building material for this project was acrylic. I raided the scrap bins at my local plastics supply store and found some styrene in my garage from long ago.

Lucian Helper
Lucian Helper

Early on, I had the attention of my son Lucian who was always asking if he could help me with something. It didn't matter what it was, he wanted to try it. I was so grateful to have him around, because it needed a child's touch to make it. I delved down into my own childhood memories as much as possible to stay focused on this.

Light test
Light test

I was constantly putting on and taking off acrylic panels for fit, detailing, fit again, more detailing, fitting, adjusting, and painting.

CLose to being done
CLose to being done

Unfortunately, over the years, I have become allergic to the super glue I use. Now I have to wear a full-face respirator whenever I use it. To give it that "Star-Ship" look, I cut and glued hundreds of pieces of styrene to the acrylic, which translated into weeks of wearing a mask and gloves, closed off in my studio. The worst part of this was that I couldn't let Lucian help me. He was heartbroken and even asked if he could get a mask like mine for Christmas so he could glue, too! I couldn't even imagine it. How ironic. Since then, I have decided not to use super glue anymore. For parts, I used some of my own old Star Wars toy pieces, used model tree parts, and cast resin parts from old Star Wars model kits, specifically the Millennium Falcon and some other old silicone molds given to me by my friend Clint. My good friend Mike even loaned me his 3-foot-long Star Destroyer resin model kit. Looking at that REALLY helped me with the exterior textures of my "Cross Destroyer". I also attached return hinges to make clear window doors over each of the rooms except for the hanger in the center.

Lucian Helper2
Lucian Helper2

Lucian and I are attaching an additional base to the back of the piece for added support.

Painting
Painting

Primer is done! It smelled up my studio for days!

Painting2
Painting2

The first wash is applied to the exterior panels. I made 18 acrylic panels for this sculpture. One was a total redo.

STAR-WARS-Board-Game-legend_sm.jpg

During construction, I constantly toyed with the idea of gluing vs not gluing down the figures. Then, I had breakfast with John and Brenda Romero when they purchased my "Icons of DOOM" sculpture while I was in the middle of making this. During that, Brenda explained a board game she was developing in detail. I came away with a new perspective on art and games. Since I was already using game piece Star Wars figures, I started thinking about making it into a full-fledged board game! When I mentioned it to Brenda, she told me she would like to collaborate! We have not done anything yet, but I am so excited to see what we can make out of the 7 levels in this odd Star Wars shrine of sorts! Figure-based board games are my favorite to play with a group of people.

STAR-WARS-detail-Emperor_sm.jpg

At the top of the "Cross Destroyer" is the Emperor's chamber.  It has a working video monitor behind him that runs footage from all the space ship scenes from the original 3 films.

STAR-WARS-detail-Carbonite-Chamber_sm.jpg

Directly below the emperor's chambers, Luke and Vader battle in the Carbon-Freezing chamber play set. This was fun installing the LED's to get that hot lighting effect.

STAR-WARS-detail-Hanger2_sm
STAR-WARS-detail-Hanger_sm.jpg

In the very center of the ship is Hanger bay 327. Here a battle rages between the Rebels and Storm-Troopers. Somewhere in this picture you can also see a Star Wars wind up music box that plays the main theme. The Tie fighter is a store bought model Lucian and I built together. The platform everyone is fighting on is from some part of a fiber optic network box I think my uncle Billy gave to me.

STAR-WARS-detail-Deathstar_sm

To the right of the hanger is the Death Star play set with Detention Block AA-23 and the garbage compactor below with Chewbacca inside. Although I must admit, the garbage compactor reminds me of an outhouse, with Chewie howling for toilet paper.

STAR-WARS-detail-Hoth2_sm
STAR-WARS-detail-Hoth_sm.jpg

To the left of the Hanger is my rendition of the Echo Rebel base on Hoth. With the exception of the figures and vehicles, this is all scratch built. The medical lab with Bacca tank was the very first thing I built. I love that entire scene in Empire.

STAR-WARS-detail-Jabba_sm.jpg

Below the Hanger sits Jabba The Hut's palace. Jabba is a Christmas tree ornament with a neat sound recording. Han Solo in carbonite is resin cast from my ice-cube mold. My favorite part of this little scene is the screen where you can see the room below. This screen is typically used in Catholic confessional booths.

Max-Rebo
Max-Rebo
STAR-WARS-detail-Rancor-Pit_sm.jpg

And of course, below, Jabba is the Rancor pit! For the stone cave, I used model railroad scenery rocks cast from rubber molds. At first, I was going to use real stones, but hydrocal plaster tends to be lighter and the stones are designed for that smaller scale look. The Rancor is a game piece. He was tricky to find, expensive to get, and not the best sculpt in my opinion but time was not on my side with this sculpture. Someday, I might have to sculpt my own.

Rancor-Pit-Room_sm.jpg
Jason Hite's Childhood Religion

All in all, I think it took me about a month to create from start-to-finish once I got the "Cross-Destroyer" idea. The best part is, the leftover toys I didn't fit into the sculpture will go to my boys to play with. Who knows, maybe we will make another one someday. Hope you like it and you enjoyed reading about my journey to build it!

If you've read through my very long-winded post, thank you! I've attached 5 free desktop image downloads you can use for your computer. Comment below this post if there's another piece I've done that you would like to see a desktop image for.

ChildhoodReligion_Desktop_Hoth
ChildhoodReligion_Desktop_Emperor
ChildhoodReligion_Desktop_Hanger
ChildhoodReligion_Desktop_Jabba
ChildhoodReligion_Desktop_Carbon

Check back to my site soon, as I'll have a video up on the sculpture.

In Assemblage, Blog, Featured, Slideshow
2 Comments

Icons of Doom

October 9, 2014 Jason Hite
IconofSin_sm1.jpg

Update 12/24/14 The Romero's have purchased the "Icons of Doom" sculpture. My 6 year old son Lucian and I met up with John and Brenda for breakfast while they were in Anaheim this past Sunday. We had a terrific time talking with them and their young son Donovan about all kinds of games including Doom. Not to mention, Brenda's fantastic board games that I must play! John even told me the story about his decapitated head in the Icon of Sin level. According to Brenda Ramero, over a hundred people told her about my sculpture online, sending them links, so they were happy to get the piece and I was absolutely thrilled to hang out with them. I have plans to do more Doom inspired sculpture in the form of a fan film so stay tuned!

John Romero & Jason Hite

Back in 1993, I was 17 years old when my mind was blown by id's DOOM. It was like nothing I had ever seen before and it changed my life. By the time I was in college, I had it on my PlayStation, and it was the first time I was able to really play. It was the best game to play for my budding monster-maker skills to absorb. I would hook up a karaoke speaker, turn echo all the way up, then duct-tape the microphone onto the TV speaker. It makes me chuckle now but this was my surround-sound at the time! With the lights out, and that dark soundscape score by Aubrey Hodges blasting,  I must have spent months playing all night till 2 or 3 am. DOOM I & II, to this day, are the only games I have ever played and beaten, that I can pick up any old time and have some fun.

Check out this fun little video promo I made with the help of my 6 year old son, Lucian, who wants this sculpture for a nightlight.

It's been 20 yeas since DOOM II was released! Have a peek at my latest assemblage sculpture inspired by id's classic ground braking first person shooter! Original music by Aubrey Hodges, sounds by Bobby Prince. To see more of Jason's work, please visit: http://hitestudios.com/

Icons-of-Doom-CU3Q.jpg

Making this assemblage piece was like reliving those fun nights of playing doom with my roommate Jay Johnson back in Pittsburgh. I even made a short film for school about a guy who goes insane from playing DOOM. I tend to spend months on a piece here and there, but once this one got in my blood, I couldn't stop. It all started with the Cyberdemon by Reaper Miniatures my friend Chris Fields gave be back in 2004. After doing a paint job on it back then I  wanted to build an environment for the little evil cyborg.

IconofSin_2.jpg
IconofSin_31.jpg

Over the years, I have collected circuit boards from computers and odd devices. The panel on the right of the demon's head was sitting in a cardboard box in the back of my YMCA getting rained on, before I "liberated" it. The guns are from the Quake action figures by ReSaurus Toys that came out back in 1998. At least they are accosted with Doom. I would have loved to make a BFG, and still might do so, but I ran out of time. I'm actually kind of surprised that no one has made one by now. The Doom Guy figure and zombie behind the Cyberdemon are slightly augmented from HorrorClix figures...and the dozen bullets were possibly live .30 caliber, (someone informed me that my water soaking might not have worked) they are being replaced with dummy ammo.

I love using found objects but I had to make some stuff too, which is the real fun part. The central Icon of Sin demon head was made using WED clay and cast in urethane resin. Below is a shot of the silicon case mold I made.  From horn to horn, the Icon of Sin demon is about 22 inches. Note how your brain tries to turn the negative image into a positive.

photo-3.jpg

Originally, I was planning on making the status hud identical with the game but I felt that the numbers and % stuff wasn't interesting enough to look at, for an art piece. I've always liked hearts to represent health in video games. One of my favorites to do this was "Splatterhouse". The heart was sculpted in Super Sculpey, molded and cast in different resins. The Doom Guy face was also done in Sculpey. The rocket launcher targeted on the demon head is actually from a Transformers Movie IronHide cannon I made with the help of my friend Mike Biasi while I was working at a Halloween Company called Disguise. Mike helped me mill and lathe it out of solid resin. I've been saving a copy for years trying to find the perfect sculpture to display it in!

The Cacodemon (or evil tomatoes) was actually my favorite thing to make. I sculpted it quickly during lunch with Monster clay. After I molded it in silicone, I carefully took out the clay, cut the top off and re-sculpted the bottom to make the Cacodemon's mushy corpse. What's neat is, I used only the clay from the original Cacodemon, as to not add too much mass to the body. The blood I used for him was a mixture of blue nail polish and 5 min epoxy. I cast the live Caco's in translucent resin and painted the insides of the mouths with blue stained glass paints. This way, I pick up the light from the lit floor beneath, giving it the illusion of them getting ready to spit a plasma-fireball.

Cacodemons
Cacodemons

Making the "Icon of Sin" level would not be complete without John Romero's smirking, decapitated head! I made a small head out of Magic Sculpt on a stick, backed on a 3" x 5" wall. This was a strange piece to fabricate, but I had to do it. I have hidden it out of normal visibility in the sculpture, so you have to physically be in front of the piece on a wall  in order to find it. This project was so much fun I didn't want it to stop. I want to sculpt all of the classic DOOM I & II monsters, fighting, dying, or even exploding. Hell, I think it would be awesome to make an entire sculpted level someday!

John Romero
John Romero
Icons of Doom 3Q
Icons of Doom 3Q
IconofSin_full
IconofSin_full
In Blog, Featured, Teaser
62 Comments

Making The Cosmic Void Light Sculpture

October 5, 2014 Jason Hite
Featured-Image-e1412572248924.jpg

This piece represents the culmination of a lot of things happening in my life.  Technically, it was an extremely challenging sculpture that took me a little longer than I anticipated. The mold alone was a real head scratchier. I thought about it for weeks and I didn't quite figure it out until I was making it! All of the light sculptures I created before this one had to be rigged with lights, after creation. With this piece, I actually sculpted in the brackets behind it to fit a specific lighting set, meaning I can make multiples with considerably less light fabrication time. The piece started out very different. As I progressed it slowly changed, but the initial block out process was quick and a lot of fun.

IMG_3772

At one point I wanted to make little pods for miniature people I sculpted a while back. I later changed my mind.

IMG_3835lr

Below is a shot of the finished clay sculpture. Can you find the chicken bones?

Finished Clay

After the front half of the sculpture was molded, I pulled out the original clay and created a quarter inch thickness of clay inside it to create a the back of the piece. This is where things started to get tricky. The pour spout was a brain teaser, but I deiced that it needed to be at the bottom of the piece. This allows it to be filled from a vertical position, bottom to top without making as many bubbles. You can also see my vents at the top of the piece. These allow the air to escape as the resin flows inside.

Back clay

Here is a shot of the finished mold.

Mold open

I used a skull underneath the central face and allowed enough space for it to fit inside of the mold. This allowed me to insert the skull inside before I cast the finished piece.

A Little Head inside

Finally, it would not have been possible to make this the way I did without my new investment; a 10 gallon Pressure Pot tank. This tank greatly helps to eliminate air bubbles, ESPECIALLY FOR CASTING TRANSLUCENT MATERIAL. The mold fits SNUGLY into that tank. If it were any larger,this would not have worked. Below is a shot of the mold in the pressure pot. Tight fit!

Pressure Pot Mold

The first casting is born!! Check out how you can see the teeth from the skull underneath the translucent resin!

First Casting

Painting this sucker is a whole lot of fun! BUT before that, I attached my LED light strips to the inside of the piece. As I mentioned before, I sculpted in special brackets on the inside of the piece to hold some light strips I purchased. Below, it is all lit up without paint. The red bits are supposed to be veins I made using pieces of bright red yearn and 5 min epoxy glue. It wasn't quite what I was going for but it adds depth.

All lit up

My first paint attempt turned out pretty good. I used DEKA stained glass paints that have to be special ordered from overseas. If you ever happen to get you hands on some, USE A RESPIRATOR MASK, that stuff stinks! Anyway, the goal here is to give it that glow from within look without blowing out all of the detail. It's quite tricky to achieve and I'm looking forward to painting a few more. Below are some shots with the lights on and lights off. The appearance also changes greatly due to the mount of surface light you have on the piece. The images below have a lot of surface light. This piece will be on display and for sale at Crated At The Port of Los Angeles in association with the HP Love Craft Film-Festival and Cuthluhu Con 2014 until the end of October.

THE_COSMIC_VOID_lights_on

THE_COSMIC_VOID_lights_off

THE_COSMIC_VOID_lights_on3Q

THE_COSMIC_VOID_lights_off3Q

This green version below is for the Auguste Clown Gallery in Australia, my first international show! I call this one "Incorporeal." They are doing a Halloween group show and I am so proud to have been invited to participate.

INCORPOREAL_by_J.Hite_normal_light


INCORPOREAL_by_J.Hite_normal_light3Q

I wasn't sure if my plug in lights would work in Australia, due to their sockets being different, so this one glows in the dark! Here are shots of what it looks like in darkness with a black light charge.

INCORPOREAL_by_J.Hite_glow_in_the_dark

INCORPOREAL_by_J.Hite_glow_in_the_dark3Q

This last one pictured below is still a WIP for a show at the Copro Gallery October 18th -November 8th. I'm going red, and in this stage all I seem to think about is red gummy bears! Wish me luck!

Gummy Art


In Blog, Featured, Sculptures, Slideshow
1 Comment

a VESSEL revived from STASIS

June 3, 2014 Jason Hite
VESSEL-Poster-1-e1401854795452.jpg

OLYMPUS DIGITAL CAMERA In 2005, I completed film called STASIS. (Still image above) It consisted of 8 minutes of pure, surreal, sci-fi, bio-mechanical, insanity. A simple visual story about a woman resurrected from the dead in a living machine. I built the 2 sets in my living room, over a 3 year period. With the help of a few good friends like David Lea, Chris Fields, George Longo, my brother Jonathan and my girlfriend, now wife, Erica Hite, we made a little piece of something from my mind which was very much inspired by the masterful works of H.R. Giger, and The Matrix. Below, is a black light painting I did in 2000. This painting was the start of STASIS. I love to paint in the dark. To bring light where only darkness was, has some interesting qualities, especially in altered states.

Staisis concept art from 2000

I discovered Giger's work at the age of 10 after my best friend's dad took my friend Mike and I to see ALIENS. My parents would not have taken me because of the R rating. I am eternally grateful to have seen it at that age because it changed my life!  By the time I was 14, I was airbrushing mural sized black and white ALIEN stuff. When I hit college, I sculpted my first Alien costume, and even a miniature-working electronic Alien head with a raccoon skull . Looking back, those were sort of bad, but I never really stopped incorporating bio-mechanics and I'm now almost 38 and full-time designer and sculptor. Bringing Giger's work into the 3rd dimension is something that has driven me to spend months on 1 sculpted piece. His death deeply saddened me. One of my goals in life was to visit his Museum in Zurich Switzerland and meet the man.

DSC_1128

Many others have inspired me on the way in my life, like Clive Barker, who I actually had the chance to work with. One day in October of 2009, at his house, Clive said to me, "You'll have to come over next time Giger visits." My jaw dropped, then he handed me an Ernst Fuchs book, who I had never heard of before. I literally could not stop looking at that book while he was talking to me. It was like seeing the work of Giger's dad, or estranged father. I still need to give Clive back the book. I've never seen so many amazing books in one place on anything you could think of. Clive's amazing home was like a cabinet of curiosities. Every nook had some interesting sculpture or book... and the paintings, WOW, that man loves to PAINT!


Park City Friends

OK, back to STASIS.  After I released STASIS, I did the film festival circuit from 2005-2006, won some awards, and ended up at "Slamdance", the alternate to Sundance in Park city Utah in Jan of '06. I made a lot of contacts, new friends, and had some momentum for funding to produce and direct part two! Parties every night, promoting every day, it was a blast.

Me and Dean H Pictured above, I was hanging out with Dean Haglund and friends. He was one of the "Lone Gunmen" from X-Files. Great guy!

Slamdance Syferous

The whole mentality of Slamdance was great. They promoted a TEAM environment, where you were supposed to help your fellow filmaker and not be competitive with each other. To promote our films we all teamed up to pass out fliers, but were unable to just give them to a passer by. It was illegal unless we spoke to the person and asked first. This was challenging. Luckily, I brought a crazy light up mask of one of my characters. I wore day and night in Park City in my WWII German officers coat. I walked the streets and people just came up to me. I passed out all of my fliers. I saw all kinds of people, even met Nick Nolte in the mask one night heading back to my condo around 2 AM. I think he was a bit drunk and did a double take then said, "The devil does walk the streets here." Nick was all dapper dressed and was a nice guy to this strange kid. I got an add in the newspaper during the week for being such a freak. It was fun and kept my head warm!

DSCN2864

However, a month after the Slamdance, my brother Jonathan was in a nearly fatal car crash. He was in a coma for about a month and a half. I dropped everything I was doing and focused on helping him. He fully recovered after 3 major surgeries and a year of PT. I cannot imagine what it was really like for him to go through. We are closer than ever and I thank GOD for his survival. Every day we watched the machines that kept him alive. As morbid as this sounds, I was fascinated by those machines. I've looked at this photo of my brother in intensive care many times and marveled at the at the REAL bio-mechanical symbiosis happening here.

Jonny ANd Jason

I learned some valuable life lessons from that time. Above we stand together, strong in October 2010. I'm the short, bald one. However, by the time I got back to STASIS 2, things were cold in terms of my contacts, but I didn't care. In 2008-2009, I picked it back up and began working on the storyboards and set pieces. Then I met and partnered with Brock DeShane and we started talking about a feature or episodic animated series. With his contacts and my work, we started generating more interest in a newly titled project called PLASMA. Three years went by and it just was not quite working. Perhaps because we lived states away from each other, or we just had different visions. I don't know, but it sort of fell apart and I called it quits on PLASMA in 2012. I was done with trying to do another stop-motion film and threw myself into doing gallery pieces. The theme in almost all of my lit sculptural pieces come from the story I want to tell in stop-motion.  On the back burner of all of these years since 2005, I have been creating bio-mechanical character puppet sculpts and set pieces in my spare time and updating my equipment. At this point, we have 7 puppets, 3 sets, a high-end Canon camera, editing programs, new computer, motorized slider, lights, camera lenses and most important of all, people interested in working on it with me. All we need at this point are materials to cast the puppets in, armatures for the puppets, a few more props, 2-3 more sets, maybe an 1100 square foot warehouse, some help animating and VESSEL might actually happen! If we can pull it off, I want to dedicate it to H.R. Giger. This man has inspired me more than anyone living or dead. Let me be clear that I am not doing this because I want to make money. NO, I am doing this because I want to share something that has been playing in my head for over 10 years now. The part of my soul that resonates with Giger's work won't seem to rest until I do it.

VESSEL Poster 1


In Blog
2 Comments
← Newer Posts Older Posts →

All artwork and images featured on this site are copyright protected by Jason A. Hite. All rights reserved.